Before you start melting anything, take a few minutes to set up. Line a cookie sheet with wax paper. This is non-negotiable. The wax paper prevents sticking and makes cleanup a breeze. If you don't have wax paper, parchment paper works in a pinch, though wax paper is superior for this application because chocolate doesn't stick to it as readily as it does to parchment. Having your workspace prepped before you melt the chocolate is important because once you start dipping, you'll want to work efficiently. Chocolate can thicken up quickly, especially if you're using a microwave, so having everything ready means you won't scramble trying to find wax paper while your chocolate sits there getting thick. I also recommend having all 24 pretzels laid out and ready to grab. Some people like to arrange them in a line near their work station so they can just pick them up and dip without fumbling around looking for them.
You have two methods for melting: the double boiler method and the microwave method. Both work equally well, so choose based on what you're most comfortable with. Double boiler method: Fill a pot with about 2 inches of water. Bring the water to a gentle simmer (not a rolling boil). Place a heat-safe bowl on top of the pot, making sure the bottom of the bowl doesn't touch the water. Add your chocolate chips and shortening to the bowl. The gentle heat from the steam will melt them slowly and evenly, which is actually ideal for chocolate. Stir occasionally with a rubber spatula. The advantage of the double boiler is that it's harder to overheat the chocolate, which can cause it to become grainy or separate. It's the gentler method, and honestly, it's my preferred technique when I have the time. Microwave method: Place your chocolate chips and shortening in a microwave-safe bowl. Heat on 50% power (medium power) for 30 seconds, then stir. Continue heating in 30-second intervals, stirring between each interval, until everything is melted and smooth. The key here is to use medium power and short intervals. Microwaves are unpredictable, and high power can overheat chocolate. By using medium power and checking frequently, you maintain better control over the temperature. Most of the time, the microwave method takes about 1 to 2 minutes total, so it's faster than the double boiler if you're in a hurry. Why do we add shortening? Pure chocolate, when melted, becomes quite thick and viscous. Adding shortening thins it out to the perfect consistency for dipping. It makes the chocolate flow smoothly off your pretzels and creates a silky coating rather than a thick, clumpy one. The shortening also helps the chocolate set more smoothly once it cools, giving you that beautiful, glossy finish.
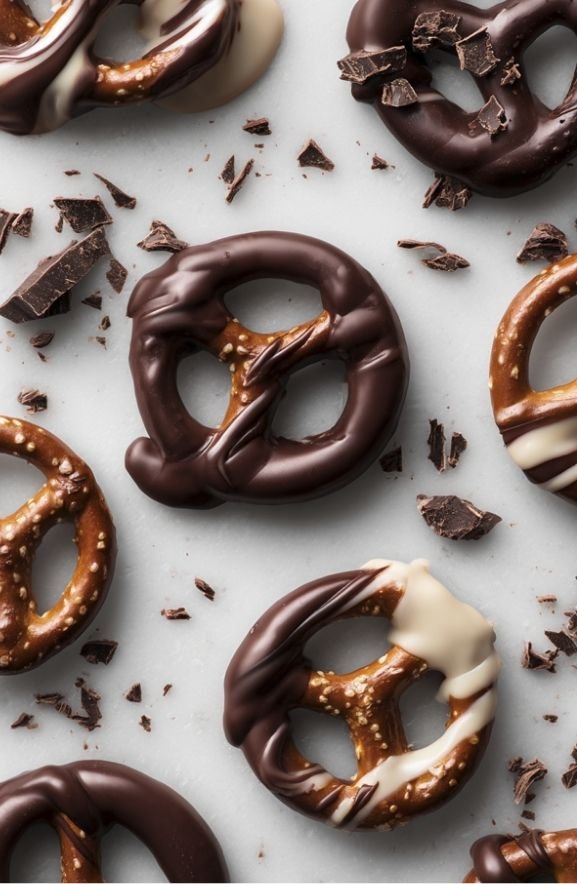
Once your chocolate is melted, stir it really well until it's completely smooth. Make sure there are no lumps or unmelted bits. This is important because lumpy chocolate will coat unevenly. If you're using a double boiler, keep the bowl over the hot water. The heat from below will keep the chocolate at a perfect dipping temperature without getting too thick. If you used the microwave, your chocolate will start to thicken as it sits, which is normal. You'll likely need to reheat it briefly as you work. Have the microwave ready and be prepared to give it 10 to 15 seconds of heat if the chocolate becomes too thick to dip easily. The ideal consistency is similar to heavy cream. It should flow smoothly but coat your pretzel evenly. If it's too thick, it becomes hard to dip and creates a clumpy coating. If it's too thin, the chocolate won't stick well and will drip off. The shortening helps get you to that perfect middle ground.
Now comes the fun part. Pick up a pretzel and gently dip it into the chocolate. You want the chocolate to coat the pretzel completely or almost completely, depending on your preference. Some people like to leave just the very tip uncovered so they have something to hold without getting chocolate on their hands. Others go for almost full coverage. The key to success here is not leaving the pretzel in the chocolate too long. A quick dip, about 1 to 2 seconds, is all you need. If you leave it in longer, the chocolate will be overly thick on the pretzel, and you'll have pools of chocolate that drip off and waste product. As you lift the pretzel out, let the excess chocolate drip back into the bowl. Tilt the pretzel slightly and hold it over the bowl for just a second or two, letting gravity do the work. This ensures you get a nice, even coating without too much excess.
Carefully place each chocolate-covered pretzel on your prepared wax paper. If you're working quickly enough that the chocolate is still warm, the pretzels will stay in place easily. If they're setting too quickly, just be gentle and make sure they're fully on the paper. Space them out so they're not touching each other. If they touch while the chocolate is still soft, they might stick together, which defeats the purpose. Give each pretzel a little room to set undisturbed.
Transfer your cookie sheet to the refrigerator. The pretzels need to stay in the fridge for at least 15 minutes, but honestly, giving them 20 to 30 minutes is even better. This allows the chocolate coating to set completely and become firm. Once they're fully set, the chocolate won't stick to your fingers, and the pretzels will have that satisfying snap when you bite into them. After they're firm, you can transfer them to an airtight container for storage, or keep them on the cookie sheet until you're ready to serve them.