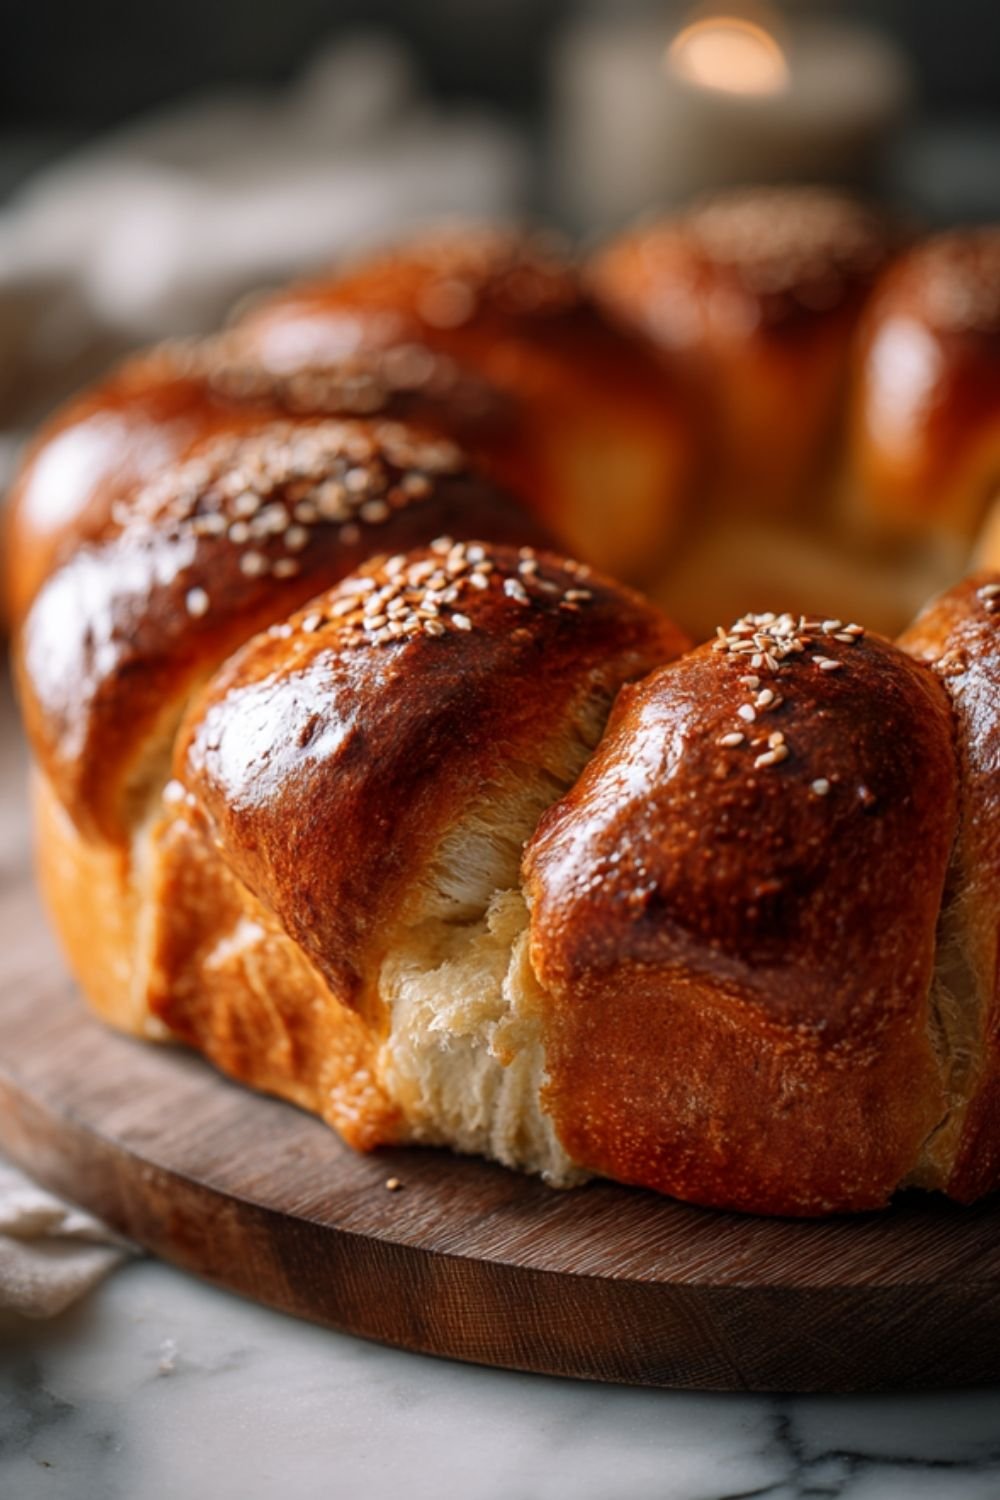
Think shaping artisan bread into impressive designs is only for professional bakers? Challenge yourself with this crown loaf and prepare to be amazed at what you can do! When I first attempted this decorative bread, I expected it to look homemade and wonky, but instead got a perfectly symmetrical wreath that belonged in a magazine.
The surprise came when I realized the technique was just rolling and arranging dough, nothing scary or complicated at all. You’ll be shocked by how such a visually stunning loaf comes together with straightforward steps anyone can master. Ready to prove that beautiful bread baking is completely within your grasp?
Why You’Ll Love This Crown Loaf
While most bread recipes send you down a rabbit hole of complicated shaping techniques and specialty equipment, this crown loaf keeps things revitalisingly simple. I’m talking basic pantry staples, one bowl, and your own two hands doing all the work. No fancy mixers, no Instagram-worthy braiding tutorials that make you question your life choices. Just straightforward dough that transforms into those gorgeous, pull-apart rolls arranged in a circle.
The butter-brushed tops? They create this golden, shiny crust that honestly looks way more impressive than the minimal effort required. It’s bread that makes you seem talented without the accompanying stress.
Looking for more from-scratch baking? Our Coffee and Walnut Sheet Cake is wonderfully satisfying to make.
What Ingredients Are In Crown Loaf?
This crown loaf comes together with just six simple ingredients that you likely already have in your kitchen. There’s no need for specialty flours or hard-to-find additives—just the basics that create a tender, flavorful bread with a beautiful golden exterior. The ingredient list is short enough to memorize, making this an ideal recipe for spontaneous baking sessions when you want fresh bread without a grocery store run.
- 2¾ cups (350g) bread flour, plus extra for dusting
- 2 tsps fast-acting dried yeast
- 1 tsp salt
- 1 tbsp (20g) salted butter, melted
- ¾ cup + 3 tbsps (225ml) warm water
- A little milk, to glaze
The bread flour provides the protein structure needed for those soft, pull-apart rolls, though all-purpose flour can work in a pinch if that’s what you have on hand. The warm water should be around 105-110°F to properly activate the yeast without killing it—too hot and you’ll destroy the yeast, too cold and it won’t rise properly. Don’t skip the milk glaze at the end; it’s what gives the crown its signature glossy, golden-brown finish that makes it look bakery-worthy. You’ll also want to keep extra flour nearby for dusting your work surface during shaping.
How To Make This Crown Loaf
- Begin by lightly greasing an 8-inch round cake pan, then combine all ingredients except the milk to form a sticky dough.
- Mix together 2¾ cups (350g) bread flour, 2 tsps fast-acting dried yeast, 1 tsp salt, 1 tbsp (20g) salted butter (melted), and ¾ cup + 3 tbsps (225ml) warm water until the ingredients are incorporated.
- Transfer the dough to a floured surface and knead for 4–5 minutes until it becomes smooth and elastic. Place the kneaded dough in an oiled bowl, cover tightly with plastic wrap, and allow it to rise in a warm place for 1–1½ hours until the dough has doubled in size.
- Once the dough has risen, turn it out onto your work surface and punch it down for a few minutes to release excess gas.
- Divide the dough into 12 equal balls, then arrange them snugly together in the prepared cake pan. Cover the pan again with plastic wrap and proof for about 30 minutes until the rolls have doubled and are touching each other.
- While the dough proofs, preheat your oven to 425°F.
- When the proofing time is complete, brush the tops of the rolls with milk to create a golden glaze. Bake for 20–25 minutes until the crown loaf is golden brown and risen.
- Remove from the oven and let cool briefly in the pan before transferring to a wire rack to cool completely. The individual rolls will have baked together while maintaining their distinct shape, creating the characteristic crown effect.
Crown Loaf Recipe
Ingredients
Method
- Begin by lightly greasing an 8-inch round cake pan, then combine all ingredients except the milk to form a sticky dough.
- Mix together 2¾ cups (350g) bread flour, 2 tsps fast-acting dried yeast, 1 tsp salt, 1 tbsp (20g) salted butter (melted), and ¾ cup + 3 tbsps (225ml) warm water until the ingredients are incorporated.
- Transfer the dough to a floured surface and knead for 4–5 minutes until it becomes smooth and elastic. Place the kneaded dough in an oiled bowl, cover tightly with plastic wrap, and allow it to rise in a warm place for 1–1½ hours until the dough has doubled in size.
- Once the dough has risen, turn it out onto your work surface and punch it down for a few minutes to release excess gas.
- Divide the dough into 12 equal balls, then arrange them snugly together in the prepared cake pan. Cover the pan again with plastic wrap and proof for about 30 minutes until the rolls have doubled and are touching each other.
- While the dough proofs, preheat your oven to 425°F.
- When the proofing time is complete, brush the tops of the rolls with milk to create a golden glaze. Bake for 20–25 minutes until the crown loaf is golden brown and risen.
- Remove from the oven and let cool briefly in the pan before transferring to a wire rack to cool completely. The individual rolls will have baked together while maintaining their distinct shape, creating the characteristic crown effect.
Notes
Can You Make Crown Loaf Dough The Night Before?
Yes, you can absolutely make crown loaf dough the night before, and many bakers prefer this method for better flavor development. After the first rise, shape your crown loaf, cover it tightly with oiled cling film, and refrigerate overnight. The cold fermentation process enhances the bread’s taste and creates a more complex, slightly tangy flavor profile. Remove your crown loaf from the refrigerator 30 to 45 minutes before baking to allow it to come to room temperature and complete its final rise. The dough may look slightly deflated from the cold, but it will puff up beautifully as it warms. This resting time is crucial for achieving a light, fluffy texture. Making crown loaf dough ahead saves valuable time on busy mornings or when preparing for gatherings. The slower overnight prove also makes the dough easier to handle and shape. Just ensure your dough is well-covered to prevent it from drying out in the refrigerator, and you’ll have fresh, bakery-quality bread with minimal morning effort.Can You Make Crown Loaf Dough The Night Before?
Yes, you can absolutely make crown loaf dough the night before, and many bakers prefer this method for better flavor development. After the first rise, shape your crown loaf, cover it tightly with oiled cling film, and refrigerate overnight. The cold fermentation process enhances the bread’s taste and creates a more complex, slightly tangy flavor profile.
Remove your crown loaf from the refrigerator 30 to 45 minutes before baking to allow it to come to room temperature and complete its final rise. The dough may look slightly deflated from the cold, but it will puff up beautifully as it warms. This resting time is crucial for achieving a light, fluffy texture.
Making crown loaf dough ahead saves valuable time on busy mornings or when preparing for gatherings. The slower overnight prove also makes the dough easier to handle and shape. Just ensure your dough is well-covered to prevent it from drying out in the refrigerator, and you’ll have fresh, bakery-quality bread with minimal morning effort.
Crown Loaf Substitutions And Variations
Now that you’ve got the basic technique down, let’s talk about how you can shake things up with this recipe. Want a sweeter version? Brush the dough with melted butter mixed with cinnamon sugar before shaping. Craving something savory? Work in minced garlic, herbs, or grated cheese into the dough itself. You can even stuff each roll with a cheese cube before arranging them in the pan. The bread flour gives structure, but all-purpose works if that’s what you have. Just know your loaf might be slightly less chewy, which honestly isn’t the worst thing.
What To Serve With Crown Loaf
Since this bread pulls apart so easily, you want things on the table that encourage dipping, dunking, and general hands-on eating. I’m thinking warm marinara sauce, herbed olive oil, or even a big bowl of soup. Honestly, you could set out some whipped butter with garlic and herbs, and I’d be perfectly content. This crown loaf also pairs beautifully with cheese boards, charcuterie spreads, or really any meal where you need something to soak up sauce. It’s bread that begs to be torn into and shared, so lean into that communal vibe.
Final Thoughts
Look, if you’ve never made a crown loaf before, I’m not going to pretend it’s some life-changing spiritual experience, but it does hit different when you pull it out of the oven and everyone at the table actually gasps a little. That butter-brushed top, those pull-apart segments, the way it still steams when you tear into it—honestly, it’s just good bread doing its job. Will it fix your problems? No. Will it make dinner feel fancier than it actually is? Absolutely. And sometimes that’s exactly what we need, right? Just bread, being beautiful and delicious without trying too hard.