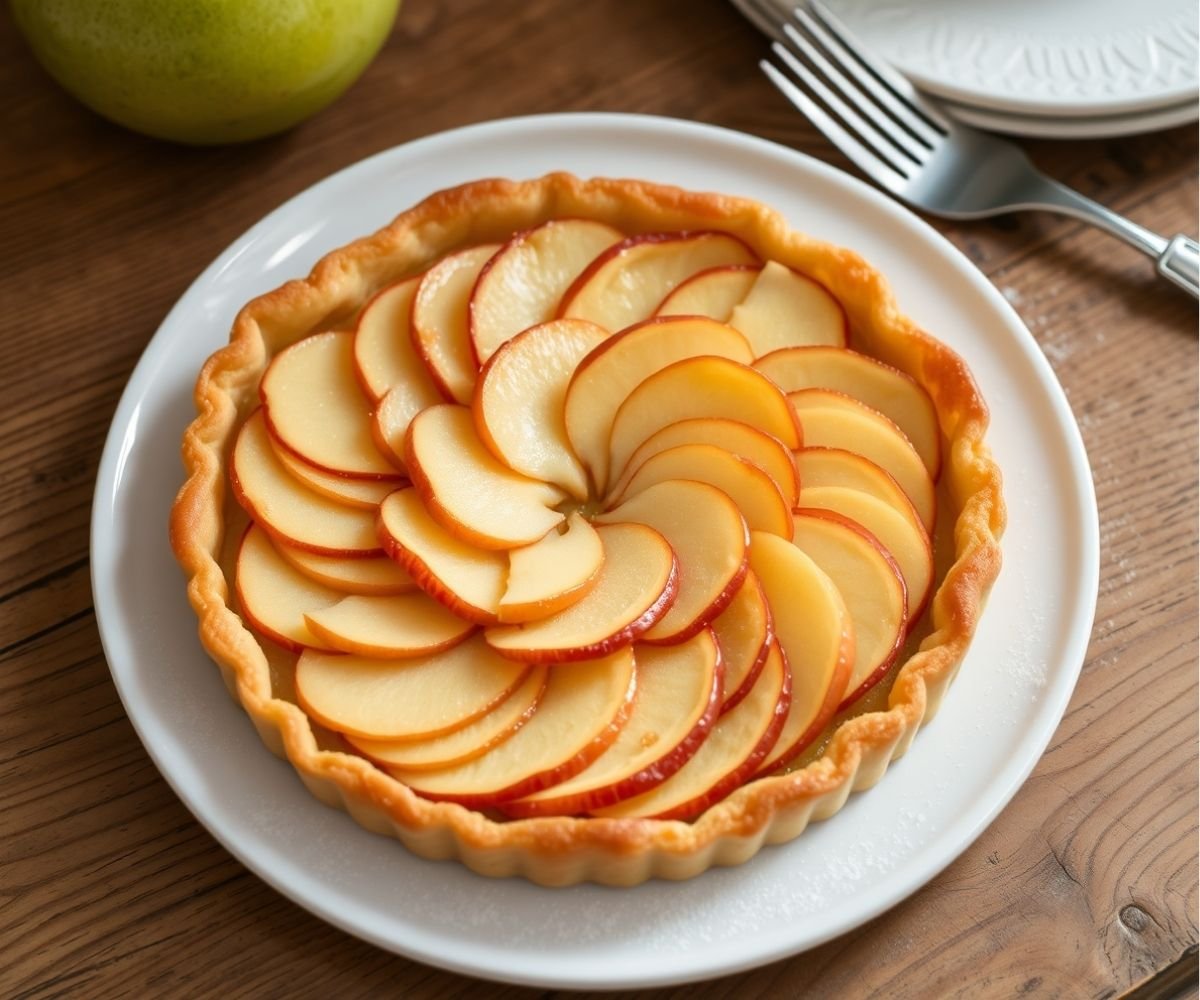
A classic French apple tart with buttery pastry, beautifully arranged apples, and a glossy apricot glaze.
Making a French Apple Tart has been one of my favorite baking projects. The crisp, buttery crust combined with tender, sweet apples always feels like a special treat. This tart looks elegant but is surprisingly easy to make at home. The glossy apricot glaze adds a lovely shine that makes it perfect for sharing with family or impressing guests. If you’re after a dessert that’s both simple and sophisticated, the French Apple Tart is a great choice.
Ingredients
For the pastry
- 175 grams (about 1⅓ cups) all-purpose flour, plus extra for dusting
- 75 grams (⅓ cup) salted butter, cubed
- 1 extra-large egg yolk
For the filling
- 900 grams (around 4 large) cooking apples
- 225 grams (about 2 small) dessert apples
- 55 grams (¼ cup) salted butter
- 4 tablespoons apricot jam
- 55 grams (¼ cup) sugar, plus some extra for sprinkling
- Finely grated zest of half a lemon
- 1 to 2 tablespoons fresh lemon juice
For the glaze
- 4 tablespoons apricot jam
If you love classic French apple tart, you might also enjoy our delicious recipe for zesty orange pancakes that bring a fresh citrus twist to your breakfast.
Instructions
- Start by making the pastry dough. On a clean countertop or large board, combine the flour and the cubed butter. Using your fingertips, gently rub the butter into the flour until the mixture resembles coarse crumbs—kind of like sand with little bits of butter throughout.
- Add the egg yolk to the crumbly mix and gently bring everything together by kneading just enough until it forms a smooth dough. Be careful not to over-knead, as you want the pastry to stay tender and flaky. Shape the dough into a flat disc, wrap it tightly in cling film, and pop it into the fridge for at least half an hour to rest.
- While the dough chills, prepare your apples. Peel and core the cooking apples first, then slice them thinly—try to keep the slices even for a nice look. Toss these apple slices with fresh lemon juice to keep them from turning brown. Next, peel and slice the dessert apples; these will go on top later for a beautiful presentation.
- Heat your oven to 375°F (190°C) so it’s ready when the tart is assembled.
- Take the chilled dough and lightly flour your work surface. Roll it out evenly until it’s large enough to line a 9-inch (23 cm) tart tin. Carefully lift the dough and press it into the tin, making sure it fits snugly around the edges. Trim any extra dough hanging over the sides. Use a fork to prick holes all over the base—this helps stop any puffing while baking.
- Melt the salted butter and brush a thin layer over the pastry base; this adds flavor and helps keep the crust moist.
- Neatly arrange the cooking apple slices across the base of the tart, covering it completely. Sprinkle the sugar evenly on top and scatter the lemon zest for a fresh, citrusy aroma. Dot small pieces of butter across the apples for extra richness as they bake.
- Bake the tart for about 30 minutes. During this time, the apples will start to soften and the pastry will begin to turn golden.
- After 30 minutes, take the tart out and carefully arrange the dessert apple slices on top in a pretty, decorative pattern. Pop the tart back in the oven for another 20 minutes or until the apples are tender and the crust is beautifully golden brown.
- While the tart cools slightly, warm the apricot jam gently—either in a small saucepan over low heat or in short bursts in the microwave—until it becomes smooth and runny.
- Use a pastry brush to glaze the warm tart with the apricot jam. This gives the tart a shiny, appetizing finish.
- Let the tart cool for a few minutes before slicing and serving. Enjoy your beautiful, homemade French Apple Tart!

French Apple Tart
Ingredients
Method
- Start by making the pastry dough. On a clean countertop or large board, combine the flour and the cubed butter. Using your fingertips, gently rub the butter into the flour until the mixture resembles coarse crumbs—kind of like sand with little bits of butter throughout.
- Add the egg yolk to the crumbly mix and gently bring everything together by kneading just enough until it forms a smooth dough. Be careful not to over-knead, as you want the pastry to stay tender and flaky. Shape the dough into a flat disc, wrap it tightly in cling film, and pop it into the fridge for at least half an hour to rest.
- While the dough chills, prepare your apples. Peel and core the cooking apples first, then slice them thinly—try to keep the slices even for a nice look. Toss these apple slices with fresh lemon juice to keep them from turning brown. Next, peel and slice the dessert apples; these will go on top later for a beautiful presentation.
- Heat your oven to 375°F (190°C) so it’s ready when the tart is assembled.
- Take the chilled dough and lightly flour your work surface. Roll it out evenly until it’s large enough to line a 9-inch (23 cm) tart tin. Carefully lift the dough and press it into the tin, making sure it fits snugly around the edges. Trim any extra dough hanging over the sides. Use a fork to prick holes all over the base—this helps stop any puffing while baking.
- Melt the salted butter and brush a thin layer over the pastry base; this adds flavor and helps keep the crust moist.
- Neatly arrange the cooking apple slices across the base of the tart, covering it completely. Sprinkle the sugar evenly on top and scatter the lemon zest for a fresh, citrusy aroma. Dot small pieces of butter across the apples for extra richness as they bake.
- Bake the tart for about 30 minutes. During this time, the apples will start to soften and the pastry will begin to turn golden.
- After 30 minutes, take the tart out and carefully arrange the dessert apple slices on top in a pretty, decorative pattern. Pop the tart back in the oven for another 20 minutes or until the apples are tender and the crust is beautifully golden brown.
- While the tart cools slightly, warm the apricot jam gently—either in a small saucepan over low heat or in short bursts in the microwave—until it becomes smooth and runny.
- Use a pastry brush to glaze the warm tart with the apricot jam. This gives the tart a shiny, appetizing finish.
- Let the tart cool for a few minutes before slicing and serving. Enjoy your beautiful, homemade French Apple Tart!
Notes
How To Store And Reheat Apple Tart For Best Freshness
To keep your French apple tart tasting its best, proper storage is key. Once the tart has cooled completely, cover it loosely with plastic wrap or place it in an airtight container. Store it in the refrigerator if you plan to eat it within 2 to 3 days. This helps keep the apples fresh and the pastry from becoming soggy. If you want to enjoy your tart later, you can freeze it for up to a month. Wrap it tightly in plastic wrap and then in aluminum foil before placing it in the freezer. When you’re ready to eat, thaw the tart in the fridge overnight. To reheat, place the tart on a baking sheet and warm it in a preheated oven at 325°F (160°C) for about 10-15 minutes. This helps restore the crispness of the pastry while warming the filling gently. Avoid microwaving as it can make the crust soggy. Enjoy your tart warm, just like freshly baked!How To Store And Reheat Apple Tart For Best Freshness
To keep your French apple tart tasting its best, proper storage is key. Once the tart has cooled completely, cover it loosely with plastic wrap or place it in an airtight container. Store it in the refrigerator if you plan to eat it within 2 to 3 days. This helps keep the apples fresh and the pastry from becoming soggy.
If you want to enjoy your tart later, you can freeze it for up to a month. Wrap it tightly in plastic wrap and then in aluminum foil before placing it in the freezer. When you’re ready to eat, thaw the tart in the fridge overnight.
To reheat, place the tart on a baking sheet and warm it in a preheated oven at 325°F (160°C) for about 10-15 minutes. This helps restore the crispness of the pastry while warming the filling gently. Avoid microwaving as it can make the crust soggy. Enjoy your tart warm, just like freshly baked!
Nutritional Value
(Makes 8 servings; per serving)
- Calories: Approximately 320 kcal
- Fat: 15g
- Carbohydrates: 45g
- Protein: 3g
- Sugar: 28g
Conclusion
The French Apple Tart is a timeless dessert that blends simple ingredients into something truly special. The buttery crust paired with layers of tender apples and a shiny apricot glaze makes for a treat that’s both elegant and comforting. Whether you’re baking for a holiday, a weekend treat, or a special occasion, this tart delivers on flavor and presentation without being complicated. It’s a recipe that’s sure to become a favorite in your kitchen!