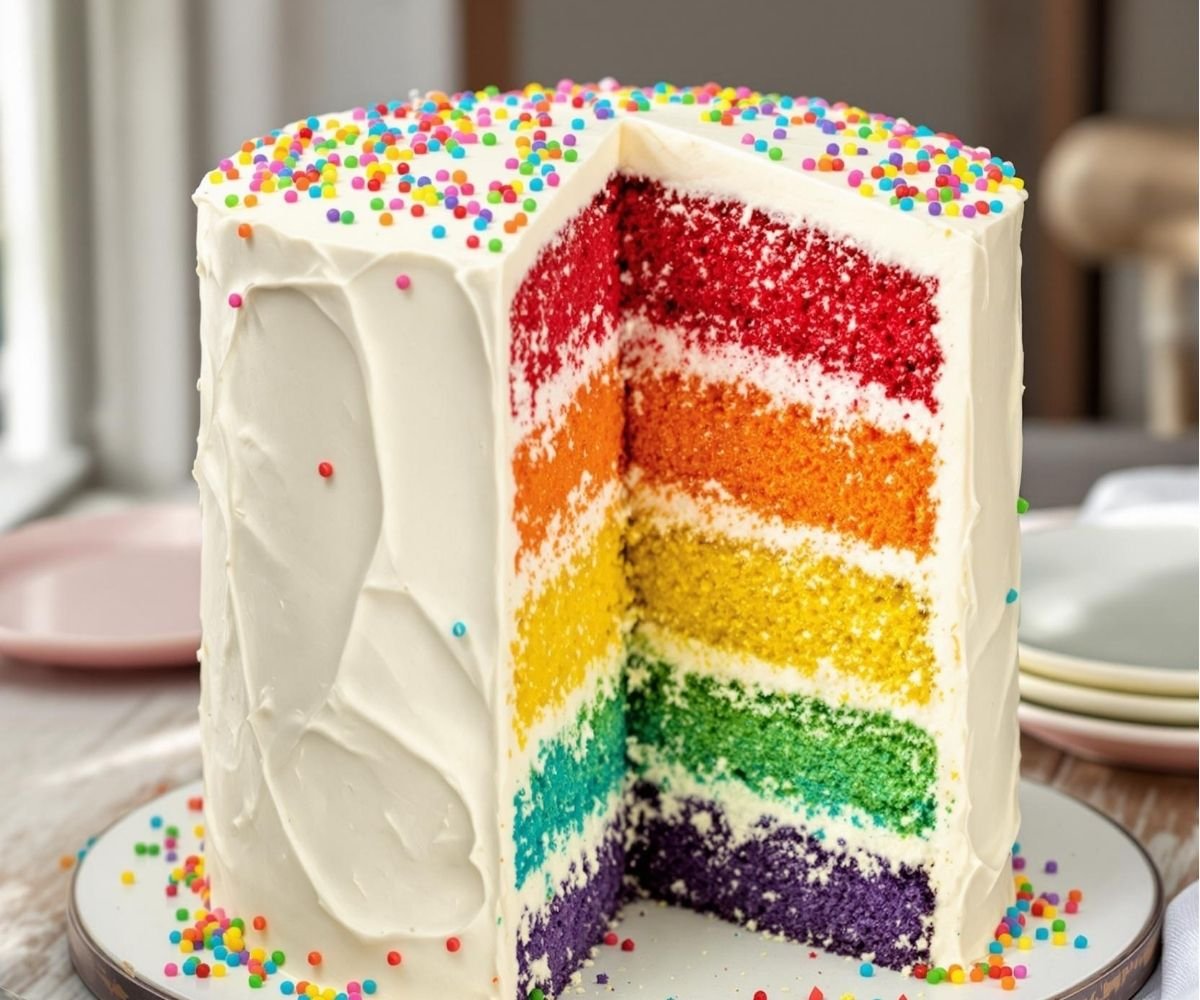
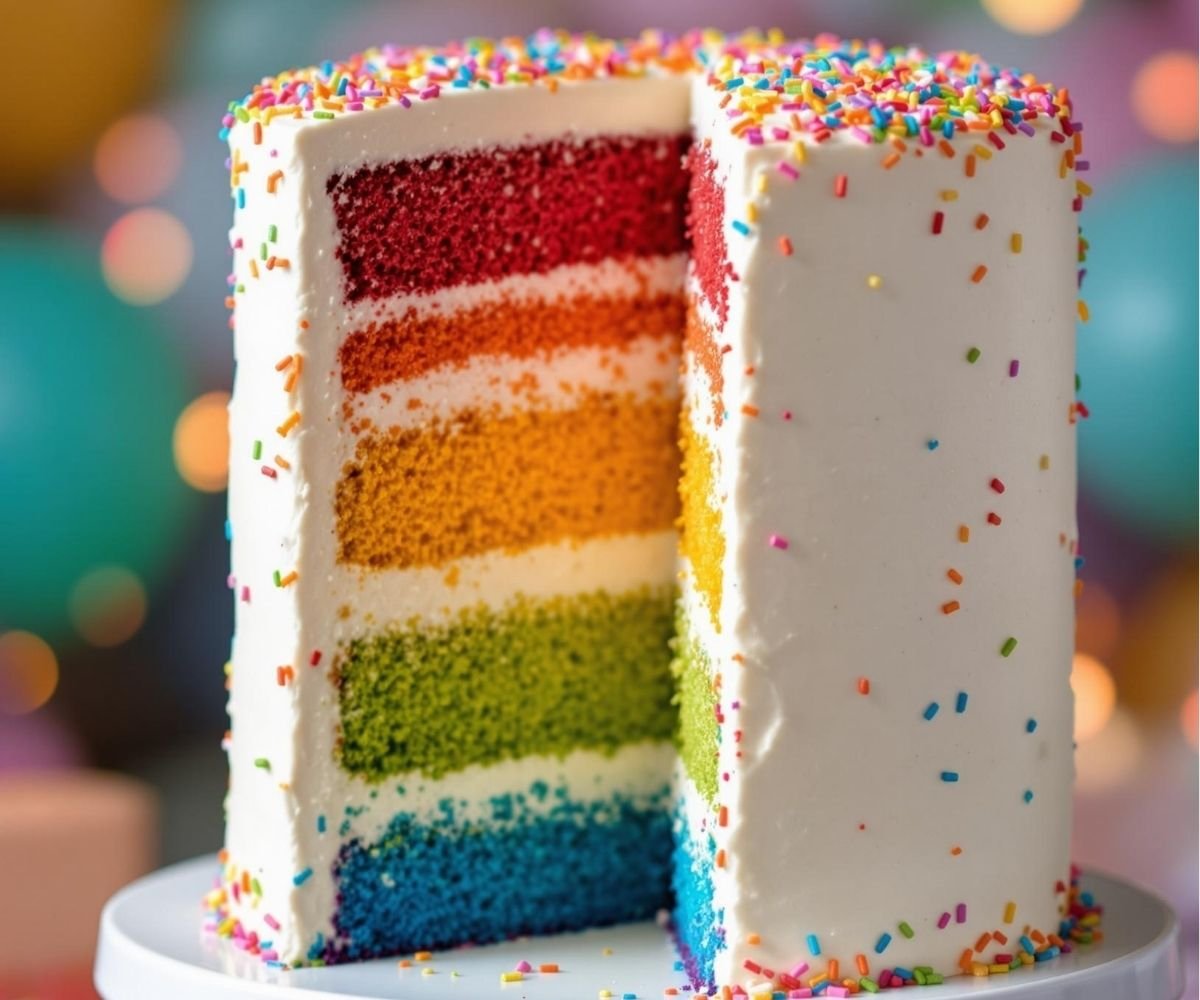
This colorful cake has six bright layers that make every slice feel like a party.
If you’ve never made a Rainbow Cake before, don’t worry—I’ve got you covered. It might look like something straight out of a bakery window, but I promise it’s easier than it looks. I’ve baked this cake many times for birthdays and special days, and it’s always a hit. The trick is to keep things simple and take it one step at a time. You just mix one batter, split it into bowls, add color, and bake the layers. Then comes the fun part—stacking and frosting! I’ll guide you through each step so you can bake your own bright, beautiful Rainbow Cake right at home.
Ingredients
For the Cake
- 6 large eggs
- 400g granulated sugar
- 390g buttery spread (cold, straight from the fridge)
- 390g all-purpose flour
- 2¾ tbsp baking powder
- 1 tsp salt
- 3½ tsp vanilla extract
- 4 tbsp milk
- Food coloring gel or paste in 6 different colors (red, orange, yellow, green, blue, purple)
For the Cream Cheese Frosting
- 400g salted butter, softened
- 3½ tbsp milk
- 800g confectioners’ sugar, sifted
- 2 tsp vanilla extract
- 300g full-fat cream cheese
- Sprinkles or nonpareils for decoration
Instructions
- I started by preheating my oven to 350°F (175°C). I greased and lined two 8-inch round cake pans with baking paper.
- I split the cake ingredients into three equal parts so I could bake two layers at a time. In a big bowl, I mixed 2 eggs, 130g sugar, 130g flour, 130g buttery spread, 1 tbsp baking powder, a pinch of salt, 1 tsp vanilla, and 1 tbsp milk.
- I mixed everything with my hand mixer for about 2 minutes until the batter looked smooth and creamy.
- Then I divided the batter into two bowls. I added purple food coloring to one and blue to the other. I poured them into the pans and spread them evenly.
- I baked the first two layers for around 15 minutes. I pressed gently in the center to check if they were springy. Then I cooled them on a rack and got my pans ready for the next round.
- I repeated the same process two more times with the other colors—green and yellow in the second batch, orange and red in the last.
- While the cake layers cooled, I made the cream cheese frosting. I beat the softened butter and milk with half the confectioners’ sugar until smooth. Then I added the rest of the sugar, the cream cheese, and vanilla. I mixed until it looked fluffy and light.
- Once the cakes were completely cool, I peeled off the parchment paper and got ready to build the rainbow. I placed the purple layer on the cake board and spread a little frosting on top.
- I added each layer in this order: blue, green, yellow, orange, and red—spreading frosting between each.
- After stacking, I covered the whole cake with a thin layer of frosting and popped it in the fridge for about 20 minutes to lock in the crumbs.
- I took it out and added a final layer of frosting, smoothing it out nicely. Then I sprinkled colorful nonpareils on top.
Rainbow Cake
Ingredients
Method
- I started by preheating my oven to 350°F (175°C). I greased and lined two 8-inch round cake pans with baking paper.
- I split the cake ingredients into three equal parts so I could bake two layers at a time. In a big bowl, I mixed 2 eggs, 130g sugar, 130g flour, 130g buttery spread, 1 tbsp baking powder, a pinch of salt, 1 tsp vanilla, and 1 tbsp milk.
- I mixed everything with my hand mixer for about 2 minutes until the batter looked smooth and creamy.
- Then I divided the batter into two bowls. I added purple food coloring to one and blue to the other. I poured them into the pans and spread them evenly.
- I baked the first two layers for around 15 minutes. I pressed gently in the center to check if they were springy. Then I cooled them on a rack and got my pans ready for the next round.
- I repeated the same process two more times with the other colors—green and yellow in the second batch, orange and red in the last.
- While the cake layers cooled, I made the cream cheese frosting. I beat the softened butter and milk with half the confectioners’ sugar until smooth. Then I added the rest of the sugar, the cream cheese, and vanilla. I mixed until it looked fluffy and light.
- Once the cakes were completely cool, I peeled off the parchment paper and got ready to build the rainbow. I placed the purple layer on the cake board and spread a little frosting on top.
- I added each layer in this order: blue, green, yellow, orange, and red—spreading frosting between each.
- After stacking, I covered the whole cake with a thin layer of frosting and popped it in the fridge for about 20 minutes to lock in the crumbs.
- I took it out and added a final layer of frosting, smoothing it out nicely. Then I sprinkled colorful nonpareils on top.
Notes
Tips For Getting Vibrant Rainbow Layers
- Use gel or paste food coloring. These give stronger colors without changing the texture of the batter.
- Color each layer separately. Mix one color at a time so you can control the shade.
- Start with white batter. Avoid using yellow butter or eggs with deep yolks to keep the colors bright.
- Don’t overmix. Stir in the color gently to keep the batter smooth and fluffy.
- Use enough color. A tiny drop won’t be enough—add a small amount, then adjust until it’s bold.
- Bake two layers at a time. This keeps the baking even and avoids crowding your oven.
- Cool completely before stacking. Warm layers can melt the frosting and ruin your rainbow.
Once you’ve mastered the layers of this rainbow cake, hop on over to our Bunny Rabbit Birthday Cake for another delightful baking adventure.
Tips For Getting Vibrant Rainbow Layers
- Use gel or paste food coloring. These give stronger colors without changing the texture of the batter.
- Color each layer separately. Mix one color at a time so you can control the shade.
- Start with white batter. Avoid using yellow butter or eggs with deep yolks to keep the colors bright.
- Don’t overmix. Stir in the color gently to keep the batter smooth and fluffy.
- Use enough color. A tiny drop won’t be enough—add a small amount, then adjust until it’s bold.
- Bake two layers at a time. This keeps the baking even and avoids crowding your oven.
- Cool completely before stacking. Warm layers can melt the frosting and ruin your rainbow.
Nutritional Value (Per Slice – Based On 12 Slices)
- Calories: 510
- Fat: 28g
- Carbs: 60g
- Sugar: 45g
- Protein: 4g
- Fiber: 1g
- Sodium: 310mg
Conclusion
Rainbow Cake is one of the most fun and cheerful cakes I’ve ever made. It brings smiles before anyone even tastes it. The bright colors inside are always a surprise, and the soft sponge with creamy frosting makes it extra delicious. If you’re ready to try something playful and sweet, this cake is the way to go. I hope you enjoy making it as much as I did!